Issue:
Message waiting light is going out even when voice mails have not been listened to.
Cause:
System has a setting which turns the lights off after 24hours is default programming
Solution:
Change /remove timer

Issue:
Message waiting light is going out even when voice mails have not been listened to.
Cause:
System has a setting which turns the lights off after 24hours is default programming
Solution:
Change /remove timer
The new versions of JAVA wont allow you to connect to web sites with self assigned certificates.


Open the JAVA config programme

Click “Edit site list”

Add the https:// address of the 3300 ( Must be https)
 Click Add, then OK until application closed.
Now you will be able to take a backup
You will need FCOS 262 264 & 280
With out these when you receive a voice mail the caller will show from “unkown”

Have you ever needed to look at the last entries in a log file.
Of course you have.
For example you want to see the last errors in the /var/logs/mail.log file
If you open it with NANO or some other txt editing programme you will have to scroll all the way to the bottom.
AND if more entries are logged while you are already in the file you will not see them!
This is a pain
“Tail” is very useful because in its simplest form
tail /var/logs/mail.log
It will show you the last 10 lines of txt form the log file
If you add the -f command it will follow the file. Meaning if any lines are added to the log file they will appear real time
tail -f /var/logs/mail.log
Use the “-F” option to force tail to follow file names rather than file objects. This can prevent problems with log rotation and other programs that may alter file names.
The grep tool can be combined with tail to filter the contents of a log file in real time. Consider the following examples:
tail -F procmail.log | grep -e “^Subject”
tail -F access.log | grep “404″
In the first command, only the lines of the procmail.log file that begin with the characters “Subject” are printed. All other lines are discarded.
In the second invocation, only entries from the access log that contain the characters “404″ will be printed. All other lines are discarded.
-n, –lines=N
output the last N lines, instead of the last 10
–retry, keep trying to open a file even if it is inaccessible when tail starts or if it becomes inaccessible later – useful only with -f
[hdvideo id=23]
[wpfilebase tag=file id=2 tpl=download-button /]
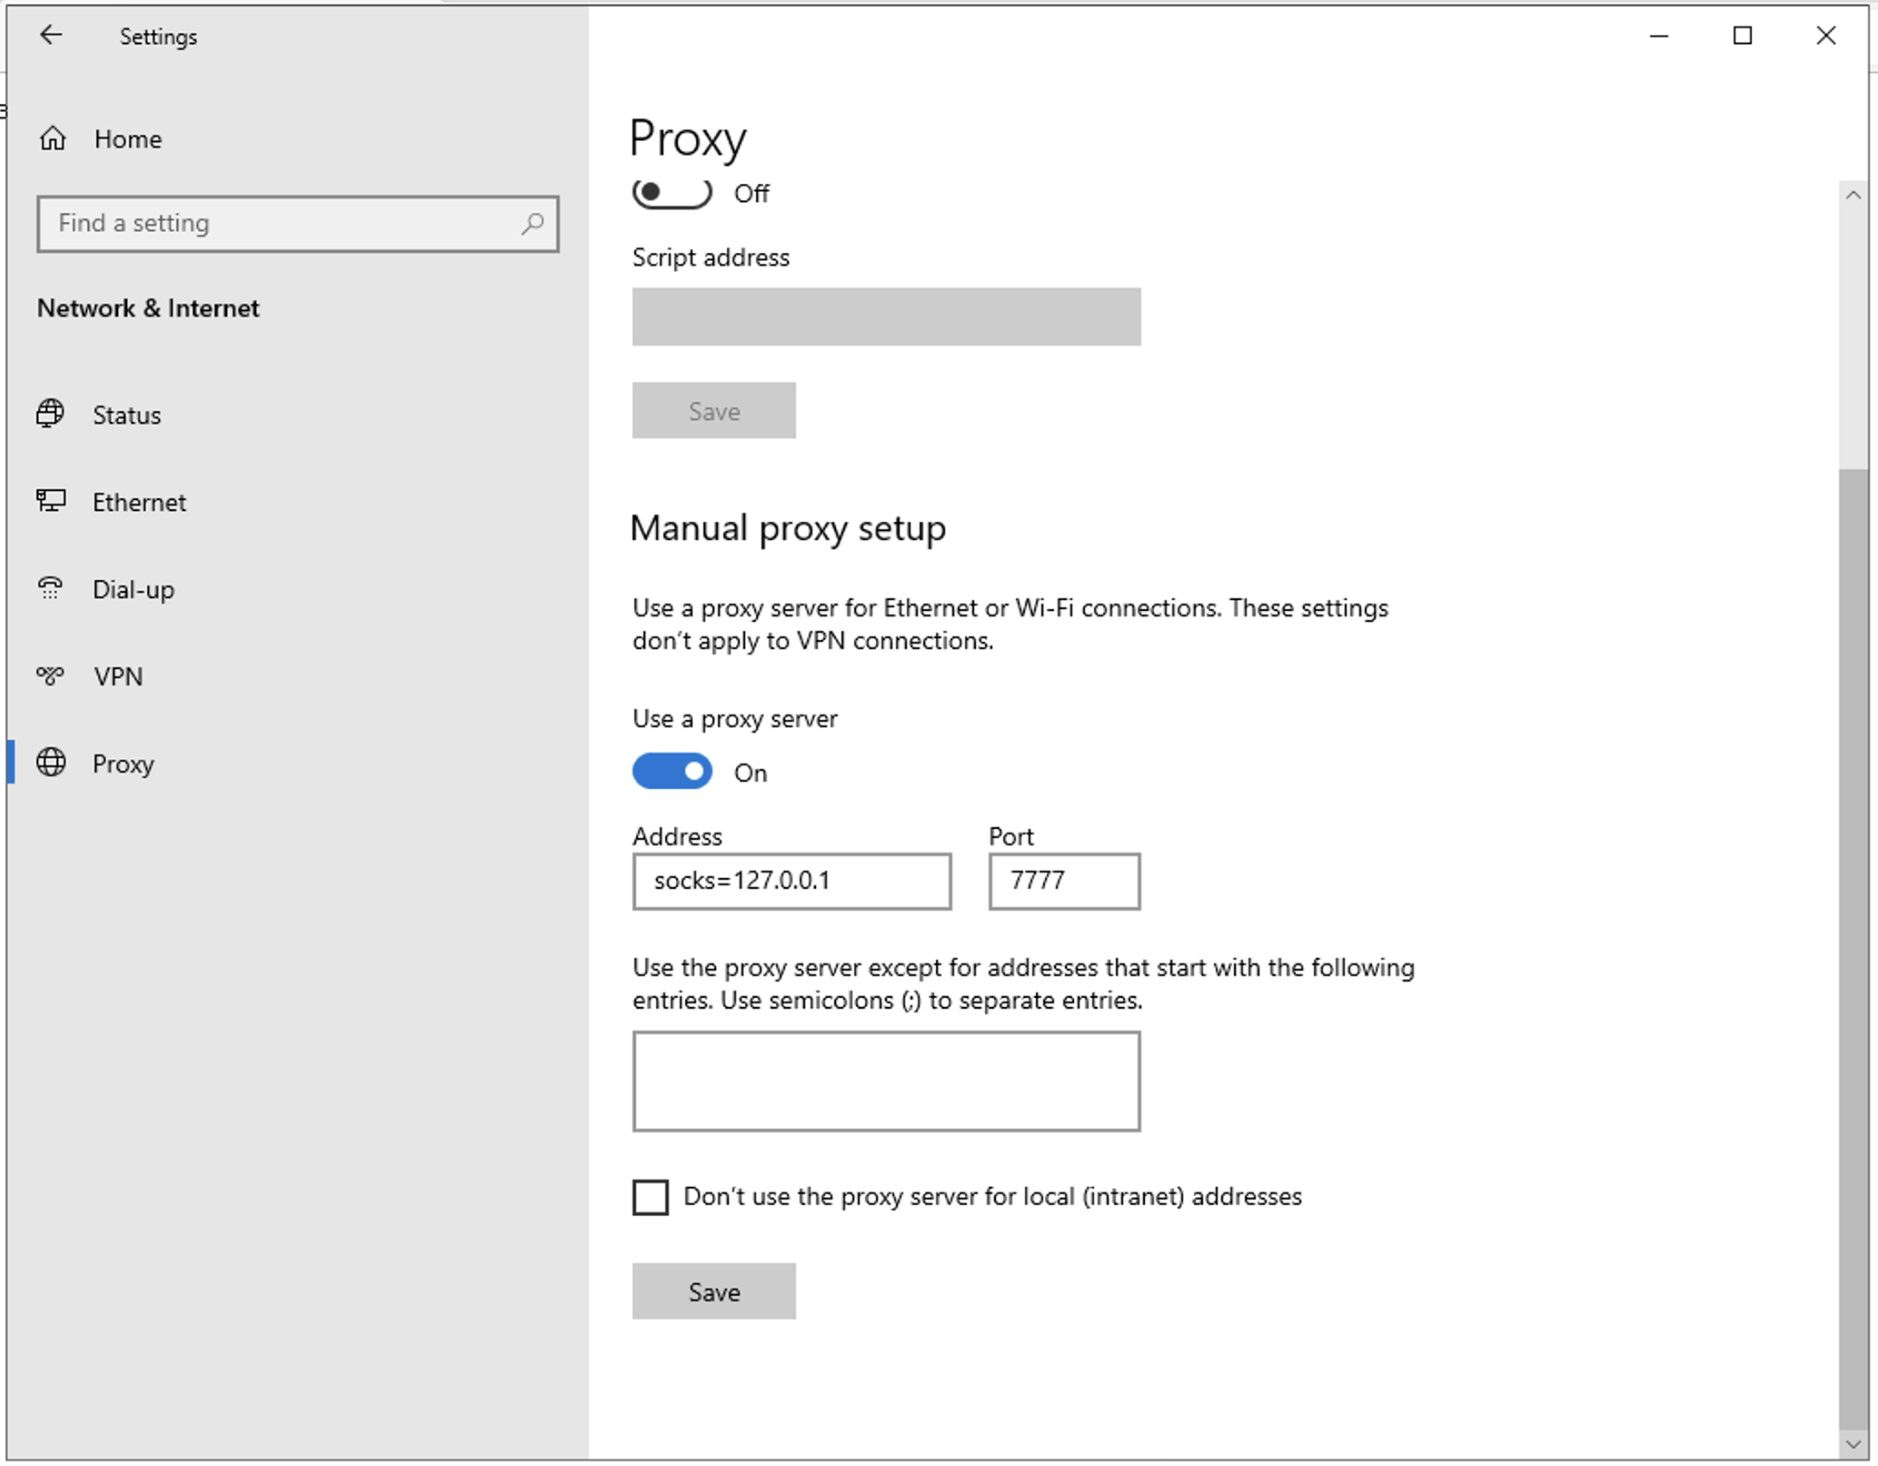
You can use the MBG to VPN to a customers network but this is another trick in your box.
From your office putty into the external address of the MBG
(This has to be allowed in the remote access section of MSL)
Setup tunnels in Putty, see below, copy this and click Add. Make sure to choose “dynamic” and “Auto”

As some of the Mitel kit requires Internet explorer(IE) i will use it as my example.
In IE choose internet options, connections,LAN settings

Now you can web browse to any web site on the customer network, including the 3300, MBG, Nupoint, ETC
UPDATE: Windows 11
To set the SOCKS proxy on Windows 11, set the protocol and the equal signal before the address of proxy:
Recently i have had a couple of bad downloads from the Mitel download site. Unfortunatley i did not know until i came to use the ISO.
Mitel Provide the CHECKSUM number for all there downloads.
To find the CHECKSUM of a file you will need to download one of the many UTILS available
I use Microsoft’s Checker
This will give you two files FCIV.exe is the useful one.
Open a command prompt
Drop the FCIV.exe file into the command prompt window then type ” -add ”
Then drag and drop the ISO you want the CHECKSUM of into the CMD window
It should look something like this

Then press enter and it when finsihed it will look like this (length of time depends on how big the file is)

Now check that number against the number displayed on the download page of MITEL next to the download link
This is useful for vMAS. Instead of transfering the ISO to the datastore of your VMWARE server, tranfer it to the mas via SFTP then mount the iso with these command.
I use it when installing the Nupoint DVD_2.
1) You must login as a root user, if not root user then switch to root user using following command:
$ su -
2) Create the directory i.e. mount point:
# mkdir -p /mnt/cdrom
3) Use mount command as follows to mount iso file called disk1.iso:
# mount -o loop disk1.iso /mnt/cdrom
4) Change directory to list files stored inside an ISO image:
# cd /mnt/cdrom

# ls -l
5) When finished you can unmount the cdrom
# umount /cdrom
A loop device is a pseudo-device that makes a file accessible as a block device. Loop devices are often used for CD ISO images and floppy disc images. Mounting a file containing a filesystem via such a loop mount makes the files within that filesystem accessible. They appear in the mount point directory using above commands